Archives
- October 2014
- September 2014
- August 2014
- April 2014
- March 2014
- February 2014
- January 2014
- December 2013
- November 2013
- October 2013
- August 2013
- July 2013
- May 2013
- March 2013
- February 2013
- January 2013
- December 2012
- November 2012
- October 2012
- September 2012
- August 2012
- July 2012
- May 2012
- December 2010
- October 2010
- September 2010
- August 2010
- July 2010
- May 2010
DS4800 Custom Beep – In Action! 10/29/2014 10:51:54 PM
Hey remember the other day how I put up instructions on how to set a custom beep on your DS4800? Well I thought it’d be good to get some documented proof of it using a custom tone. Yes I used my iPhone in portrait mode to record it.
Symbol TC70 10/24/2014 11:05:01 PM
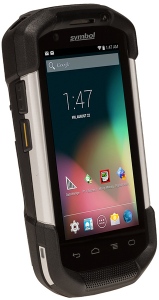
 The transition from Motorola back to Symbol is well underway, with the TC70 being one of the first new mobile computers to eschew the batwing in favor of SYMBOL. This device is built for enterprise data management in the four walls and should be a good fit for retail and even light industrial work.
The TC70, to me, is a burlier upgrade on the MC40 mobile computer. It runs Android KitKat OS (4.4.2) using Google’s Android Open Source Project version of the OS. This means you don’t get access to the Google Play store, which is a bit of a bummer if the software you need to install exists there. Software can get side-loaded onto the device, so I think you can get the Google Play store on there maybe.
To power the Android OS, the TC70 runs on a nimble 1.7 GHz dual core processor with 1 GB of RAM. There’s 8 GB of onboard storage for apps files and whatnot; if you need more storage, there is a microSD slot that supports 32 GB cards. So 40 total GB of data storage, that’s a lot of Starland Vocal Band albums.
Data capture is a snap with the TC70. It has the SE4750 2D imager built-in, which is similar to the scanner found in the DS4308. You get a solid scanning range with the scanner, about 2 feet for retail barcodes, and then some variance for different symbologies & densities & whatnot. There are also two cameras on the TC70. A rear-mounted 8 megapixel camera is fantastic for proof-of-delivery, documenting damage to shipments, or taking pictures of awesome vans. There’s also a front-facing 1.3 megapixel camera for video chat and selfie purposes.
The screen is 4.7″ and runs at a native 1280×720, so you should be able to watch 720p videos with ease. Or see inventory and pick lists easily. Depends on how laid back your business is. It uses Corning Gorilla Glass 2 for the screen, tough enough to handle drops and spills and accidental damage. The touchscreen on the TC70 is “dual mode capacitive touch.” It does work with gloved fingers, which is great if you’re on the shop floor and are worried about losing a finger. There’s also a “wet mode” which provides increased accuracy when moisture is on the screen. Wet capacitive screens tend to act really funky, so this is a great additon.
Battery life shouldn’t be an issue with the TC70. It comes with a 4620 mAh battery, which adds to the heft and also provides a TON of power for watching movies or doing your job.
DurabilityDurabilty is a big piece of the TC70’s game plan. The mobile computer is built to IP67 standards, so it’s completely sealed against dust and water dunks. I have not yet tossed mine in a bucket of water, but I do plan to when we’re done covering it and extolling its virtues both in text and video.
The mobile computer is reinforced with burly overmolding, protecting it from six-foot drops to concrete and 2,000 one-meter tumbles. You could say it rolls down stairs, alone and in pairs. Another thing to notice about the TC70 is that every button is recessed below the overmolding. I’ve been told this helps improve the longevity of the buttons, since in a drop the main point of impact would be the rugged parts and not the moving parts. It’s the little things, am I right?
AccessoriesThere are a few accessories available for the TC70, further improving its functionality. However, because the mobile computer is sealed, the connection points are a little different than you’d find on a standard smartphone.
Trigger Assembly – This converts the TC70 to a more traditional style mobile computer, making it easy to scan barcodes and also manipulate data on the screen.
Snap-On Card Reader – For mobile POS or line busting, this is a great addition. It snaps to the base of the TC70 and provides some added encryption to prevent data from getting into the wrong hands.
Audio Nugget – This is just a great name for a thing. Since the TC70 is sealed, there’s no audio jack on it. The “audio nugget” snaps onto the back of the mobile computer and provides an audio jack, in case you need to do voice picking or VOIP stuff. Audio nugget.
Charging Cables – Sometimes you don’t need a full cradle to charge your mobile device. This cable snaps on using magnets to hold it to your TC70, charging it up over USB or AC cable.
ConclusionThe TC70 is a great, multi-faceted tool for data management within a business. With the right snap-on accessories you can convert it to a powerful line busting tool, a shipping/picking dynamo, and more. It’s built to handle a beating, making it a great choice in hardware stores, lumber yards, or garden centers for retail. I do want to throw it in some water and see how it handles that.
How to Create Custom Audio Tones on your Symbol DS4800 10/13/2014 6:28:37 PM
 Did you know the DS4800 can play customizable audio tones when you scan a barcode? Yeah, no kidding, it can do that. I was told this from product launch, but I was never able to figure it out. Then the newest version of 123Scan added a curious “Custom Scan Tone 6” selection to the DS4800’s list of tones. But I couldn’t find a way to get the data onto the scanner, until yesterday.
In its current incarnation, it requires quite a few steps, and a lot of trial and error, but hopefully I’ve cleared most of that up so you can have an easier time getting whatever you want onto your DS4800. I’ve been told it’ll eventually be incorporated into 123Scan, but in the meantime it takes a few extra steps.
IngredientsSo this turned into a recipe rather quick, seems like a fun way to explain it all. Anyway, these are the PDFs and applications you’ll need to customize your DS4800:
DS4800 Product Reference Guide – It’s 478 pages, it talks about everything from optimal viewing angles to setting the scanner up to support traditional Korean keysets.
DS4800 PRG Appendix J – This is the section of the Product Reference Guide that covers setting custom tones.
Motorola Scanner SDK – This is the software you use to upload audio tones to the scanner. It has a ton of other really cool stuff too, like a way to test image capture or scale output. If you’re providing support for customers with Motorola or Symbol scanners, this should be in your toolset.
Motorola Scanner SDK For Windows Developer’s Guide – At 142 pages, it’s a bit big, but it does have error code descriptions and general tips for using the software. It’s not fully necessary, but it’s good to have in case something weird happens.
An Audio Editor – I’m using Audacity because it’s free and is pretty easy to set up. But if you have an audio editor in mind that can set sampling rates, bitrates, and can export as WAV, that works too.
I’d recommend installing the apps prior to getting started. The Motorola Scanner SDK requires additional software, so there may be a couple reboots before it’s ready to go. Audacity might require additional software to be installed prior as well. But once they’re installed, we can begin.
Audio File Prep(I’ve created the walkthrough for Audacity. If you have your own software, your mileage may vary.)
The DS4800 has very specific requirements for audio files:
- WAV file format
- 16 kHz sampling rate
- 16-bit audio
- Under 128 KB
If there’s even mild deviation from these settings, the file won’t upload. Thankfully, it won’t break the scanner either. I’d recommend making a few, you never know if you’ll want to hear the Pac Man noise with every scan in perpetuity, or if you’d prefer the coin noise from Super Mario Brothers. Or Angie from 30 Rock saying Ham. She says it really well. Regardless of the file, you’re going to need something that is about 1 second long, otherwise it’ll be too large, even when downsampled.
Once the audio clip is trimmed to your liking, you’ll need to prep it for import, which is a few extra steps.
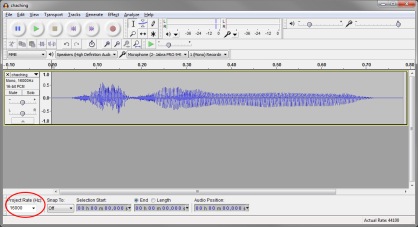
 The first is to change the sample format to 16-bit. This is located on the audio wave form, next to the file name. You expand that menu and choose “Set Sample Format” then “16-Bit PCM”.
Next, go to the track menu and select “Resample”, then set the new sample rate to 16000 Hz.
Finally, change the “Project Rate (Hz)” at the bottom left of the screen to 16000 as well.
 Now whatever you export should be ready to go onto the DS4800. From the file menu, choose Export Audio, and save it to a location on your computer. The filetype should default to “WAV (Microsoft) signed 16 bit PCM.”
So you have your files, and probably a big grin on your face, because who doesn’t want their scanner to shout IGNORE ME after every scan? Now to get those files onto the DS4800.
The first thing is to set your scanner to Symbol Native API (SNAPI) with Imaging Interface. This allows the scanner SDK to connect to it and send files back and forth. It’s also as easy as scanning this barcode right here:
 You can also find it in the Product Reference Guide in section 3-5 (Page 37).
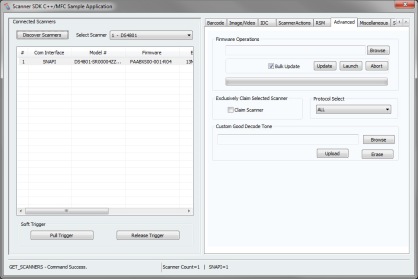
Now that it’s switched, unplug the scanner and start up the “Motorola Scanner SDK C++ Sample Application.” That’s a hell of a name. It’s located in your start menu, so Start->Motorola Scanner->Scanner SDK->C++ Sample Application.
Plug the scanner back in, and once it’s started up and ready, it will be identified in the software after clicking the “Discover Scanners” button in the upper left.
 Next, click the Advanced tab. At the bottom of that tab is a section, “Custom Good Decode Tone,” that’s where you can upload the file. Click browse, navigate to the file and click Open. Then click upload. At this point you’ll see a status message at the bottom left of the screen:
UPDATE_DECODE_TONE – Command Success – This means you now have your very own custom tone on your DS4800.
With the audio file added to the scanner, it’s time to test it out. Scan the “Scan Tone 6” configuration barcode, either from the PRG, the Appendix, or this picture right here:
 And now test it out! Scan some barcodes! It’ll be so novel!
I ran into more than a few issues while setting this up, primarily having to do with the filesize and precise formatting of the audio files. Since this product is so new, there isn’t a lot of documentation available for it. If you try to upload an incompatible audio file, the SDK will display some error codes. I’ve listed what the Motorola Scanner SDK For Windows Developer’s Guide describes the error as, along with what I assume is going on.
UPDATE_DECODE_TONE – Command Failed. Error:107 – Invalid Argument – This one only happened for me when I tried uploading files from a network location and not something directly stored on my computer.
UPDATE_DECODE_TONE – Command Failed. Error:117 – Operation Failed In Device – This means the audio file is not exactly what the scanner is expecting, so maybe the bitrate is off, or the Hz, or something else. Update 10-16-2014: It also means the firmware is not new enough to support custom audio tones.
UPDATE_DECODE_TONE – Command Failed. Error:308 – Arguments in inXML are not Valid – I don’t know what this one meant, it was sort of a variation on Error 117 I guess. It happened on a couple files that were too large, but also happened on some that were over 60 Kbyte but less than 128 Kbyte.
These issues shouldn’t crop up if you follow the steps up above. If they do, please shoot me a comment or an email or maybe send a carrier pigeon my way with your question.